Sunday, November 7, 2010

Developing for the Microsoft Surface

My plan for the current semester was definitely to the try out some touch devices, which is why I bought an iPod touch. But little did I know that I would be developing for the Microsoft Surface. I am working with the Utrecht School of Arts (HKU) on a project for the Dutch Game Garden, and so far looks quite promising.
The Microsoft Surface has a huge area that can detect and track an almost infinite amount of fingers. Ok, not infinite, but more than it makes sense to have on it at any given time. Because it uses image processing and not touch, it has some more tricks up the sleeve. For example, tags recognition, markings that you can print or stick to any object and track it on the surface. As well as raw image processing if needed. The SDK is .NET based, so you get to access the .NET Framework and you can use both Silverlight and XNA.
On the other, the machine is hugely underpowered and the GPU is especially ridiculous, considering the $12000 or so price tag. Most of the demos and samples had a reaction lag unacceptable for most game scenarios, which did make me a bit worried. On this particular I get to be the engine architect, so I decided to start from zero and build an engine based on XNA. As it turns out, the lag in the samples actually came fro the way Silverlight processes events, so the XNA games runes smoothly on 60 fps. Leveraging on the power of C# (using reflections, serializing and a some generics abuse) in under two month we have developed and a system that has an in-game world editor, flexible gameplay elements, collision detection with a bit of physics and even our own profiler. In the last phase we will of course inevitable see the ugly side of C# when we'll need to optimize the whole thing to keep running on 60 fps.
The device also brought to attention some interesting design challenges, like which point of view to take so that from no angle the game looks upside down. And that thing should be addressed next week, hopefully just in time for me to report on it. In meantime you can check this video of some of the earlier prototypes.

Sunday, October 10, 2010

GDC Europe Retrospective


It took me some time to write few words for the GDC Europe and not because there wasn't much said on the conference. On the contrary there was so much material, that I needed some time to digest it and put in into the right perspective.
Me being in general on the technical side, I tried to catch as many of the technical lectures as possible and some were very insightful. I'll pick three of them that stuck to my mind and give a short overview.
Eric Chahi from Ubisoft gave a lecture on High-Performance Simulation, by going through the details of their Project Dust. Now named "From Dust", it is a god game where you have the ability to control a dynamic world shaped by the elements. The game achieves interactive simulation of earth, water and wind in the world, by subdividing it into a grid. Each grid cell is simulated separately, using the neighboring cells as inputs. This idea is often used weather prediction models, but what makes the current implementation is the extreme performance optimization done, so that it can run smoothly on consoles. All the data and code per cell are structured so that they fit in 256KB, so all calculations can be done on a Playstation's SPU's or in the case of the Xbox 360 without a single cache miss.
Michael Drobot from Reality Pump Studios gave a lecture on Advanced Material Rendering, which was mainly a collection of dirty tricks on Deferred Shading. Many of them used the long forgotten technique of dithering. Memorable lecture was also given by Mathew Rubin form Black Rock Studio, the focus of which was the “in studio” pipeline, which allows designers to construct and test their levels in shortest time possible. The topic of most of the lectures was quite narrow, but most importantly it gave a glimpse on how deep are developers prepared to dive to create next generation of games and supply their designers and artists with the best possible tools.
The lectures by Crytek and Autodesk were slightly disappointing in comparison and were used more as a showcase for their products than technology lectures. If I would have been a game producer making a choice which technology to license, the lectures would have been more helpful; but I am not.
The real jewel of the conference however is the mix of disciplines that it includes, so I later shifted my focus towards the fields less known to me, like game design, production and even marketing. The ideas presented were extremely helpful often timeless, as good design doesn’t go bad. Which is more than can be said for rendering techniques. Warren Spector’s keynote on the relation of games to other media has been a guideline for most of my recent game design decisions. The lecture by Louis Castle on how to survive the industry was least to say an inspirational one.
In conclusion, I was a great experience to be part of the game-making world. I would love to be there again, and next year with a project to showcase.

Monday, September 20, 2010

Going all Apple


After quite some years sitting comfortably in the PC camp, last month I decided to go Apple all the way. And by PC user I mean Microsoft Certified Trainer, DirectX and .NET developer and an avid gamer. Now what makes a man turn Mac and fork money for computer that is being sold in the lobby of a fashion store here in Utrecht?
  • It’s the only way to develop for the iPhone/iPod touch.
  • It’s shinny.
  • And finally it’s the only way to develop for the iPhone/iPod touch.
Obviously strong reasons…so I bought an iMac and got an iPod touch for (almost) free. After few weeks of using it all I can say is, I love it! Snow Leopard runs extremely smooth and so does Window 7. The bright LED screen blows my 22” Samsung LCD out of the water. It runs whisper quiet even when under heavy load. The sound signal doesn’t have interference noise from the hard drive or any other hardware component, unlike my previous not-so-cheap HP. The ergonomics are great (except for the silly location for the stereo jack!) and the drivers for my Wacom Ituos4 tablet seem to be more stable, allowing me to use hardware rendering in Photoshop. Time Machine is the best backup solution I have used, easy to set up while still giving you all needed options. Compatibility is no issue as it runs Microsoft Office (in fact did from the 80’s) and easily shares any media with my Xbox 360.

However few things are less then perfect. Graphics performance is below my expectations. Both Maya and Portal ran slower then under Windows and on top of that Portal shows screen tearing and flickering. Using vertical sync didn’t alleviate the problem either. I am not sure if it is the GPU drivers, the OpenGL implementation or the game itself, but needed my Windows 7 installation anyhow. How else I am going to run Visual Studio, my all time favorite Microsoft product (after the Xbox steering wheel :) )

[Non-geeks can skip this paragraph]
And this takes me to developing on the Mac, which why I have it in the first place. Xcode in my opinion is not as slick as Visual Studio. It is not always easy to find the window that you need without using Exposé. Alt-Tab is less then useful as all windows of the same application are bundled together, so after getting to your application you need Cmd + ~ to cycle through the windows. On the other hand the excellent code editor stays out of your way and the simple code completion is better than IntelliSense for C/C++, which is not too hard to beat. The language of choice (or lack of one) for developing applications for the Mac and iOS (iPhone/ iPod/iPad) and hence Xcode, is Objective-C. Objective-C has syntax that can make C++ look elegant and C# a wet dream. The language does have some great features like categories, allowing for extending the functionality of an existing class without creating a new one but the memory model is somewhat scary for game developers. It has all the performance nausea of a garbage collection with none of its benefits.

Is it all worth to have your game on the small screen and potentially thousands of people enjoying it? Hell yeah! So be on the lookout for some handcrafted pixels hitting the App store.

Thursday, August 26, 2010

Gamescom 2010

Thanks to the fine people of Task Force Innovatie Utrecht I got to see this year’s gamescom and GDC Europe. And what I got was more information on games than one can handle, so I’ll try to put what stuck to my mind most into few paragraphs, combined with some photos.

I’ll start with the organization of the gamescom fair, which was excellent. The daily ticket also included a train ticket for the same day, combined with the city’s train system, made getting to the fair a breeze. Quarter of million people flooded the Cologne exhibition center, yet I never felt that it was too crowded. However, I did have to wait in line for quite a bit in front the booths of most games, except the teen rated ones.

The first thing I noticed; German players seem to be big on the MMO games and games featuring dragons and monsters in general, so naturally plethora of those were being showcased. My personal favorite was Torchlight II. It has the same unique visual style of the first game, while removing many of the annoyances of its predecessor. Moving on to the next hall...


Two trends that were predominant on the fair and can give a glimpse of what is in store for the next year or so, were motion controllers and 3D. Nintendo has been ruling the sales with the Wii, largely due to its motion controller, the Wiimote. This holiday season, both Kinect for the Xbox 360 and Move for the PlayStation are coming out. The two new devices and completely different and both have their pros and cons.


The PlayStation Move is a more traditional controller and somewhat similar to the Wii remote. The main controller has the usual PlayStation buttons including a trigger. It tracks motion and rotation over all axes independently and it feels quite accurate but in some games there is an annoying lag between the input move and the reaction on screen. Most of the games shown that were using the new controller were casual games made especially to take advantage of motion input. My personal favorite was on on-rail shooter that actually had similar gameplay to Duck Hunt for the Nintendo Entertainment System (NES) from 1984. On the other hand, the serious games using the PlayStation Move, like Killzone 3 and SOCOM 4, worked perfectly fine without it.


The Xbox 360’s Kinect takes a whole different approach by removing the controller all the way. The Kinect allows the Xbox 360 to do a full motion capture of two players in real-time, using a whole array of sensors including an infrared projector. We have all seen that after some time with the Wiimote everyone learns how to fake a move and do it with least amout of effort . Kinect on the other hand tracks the movement of the whole body in space, so you really have to jump around to make things happen in the game. I had lots of fun playing Kinect Adventures!, Kinect Sports and even Dance Central; and if you have seen me dance you would know I not exacltythe dancing type. All of the Kinect demos were done in a protected bubble, so my main concern is the ability if the sensor to handle distractions and noise. There could be people moving in the background, dog running if front of you legs or simply having a table in the living room.


3D was a big topic on the GDC and lots of games were shown in 3D later at the gamescom; even Halo Reach was playable in 3D. Crysis looked great in 3D and the effect had been carefully balanced to add to gameplay rather than just serving as an eye-candy. Sony bring full support for 3D TV screens to the PlayStation over the HDMI 1.4 standard. But even with Nvidia’s crystal clear 3D Vision my eyes get tired and headache might follow. So I'll just say that I can’t wait to see Wipeout HD in 3D. I bet this time around they can bring up seizures even to people without epilepsy.

Regardless of the upcoming technical novelties coming in the next year, I am personally most exited about upcoming games that focus on fun gameplay, like Portal 2, Little Big Planet 2 and hopefully and plethora of good Indie games like Limbo and Burn Zombie Burn!

Sunday, May 9, 2010

Going HD and Twitter-y

I'll try not make it sound like a commercial for Utrecht University, but the projects in the last period were just pure awesome. So awesome, only to be fully captured in HD. The notebook had to be suspended in midair to get some fresh air respiration as it embarked on a three day pixel crunching journey to create the following 30 seconds of animation. Enjoy a bit of programmer's artwork.

On top of this, I have decided to go all Twitter happy to spread some pixel furiosity a bit faster. Follow me on http://twitter.com/furiouspixels

Thursday, March 18, 2010

Fiat Turbina - The Making of

It seems that I have one more post on ray-tracing, but now for something a bit different, a 1954 Fiat Turbina. I have chosen this model because of few reasons. It is sufficiently complex and there can be many approaches on how to model it. Equally important, it was the most aerodynamic shape of a car for 30 years, powered by a gas turbine yet technologically and commercially a complete failure, making it somewhat romantic.


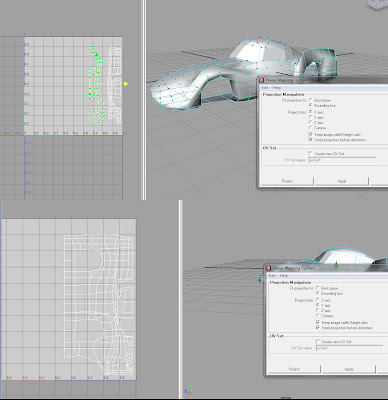
What follows is not really a tutorial, but more a "making of". I'm not a 3D artist nor an expert on Maya, but I will try to answer any questions. I will start with the making of the wheels that will be used later. For this purpose I had set up an image projection for the side view and added tubes showing the rough dimensions of the tire and rim.


Then I drew a profile curve, revolved it into a tire and set up a cylindrical UV texture coordinate, needed for bump mapping.


Next I used revolve to create the rim, the axel of the rim and then a cylinder for the rim spike.


I cloned 32 spikes using Duplicate Special to create the complete rim.


I added "Gametechnology" text as a tire brand and bended it.


With the wheel done, I moved to the handle for opening the bonnet. As the handle is small and does not need to be modeled in much detail, I used polygon operations on a box to get the basic shape and then applied smooth to it. I started with a box and then pulled the vertices the get the silhouette


I then extruded the top faces and re-sized them.


And finally, I extruded the actual handle part of it.


With the small details done, it's time to move on to the body of the car. There are royalty free schematics on the internet for most cars, even exotic ones like the 1954 Fiat Turbine. I used three projections, one for each view.


In hope to work with NURBS, I drew the cross sections of the car.


After few tries with NURBS, I decided to leave that to the industrial designers around the world and other skilled professionals and move on to SubD surfaces. I used Loft to join the cross sections and get a polygonal mesh, which provided a better starting point then a simple box.


The next few steps show the process of refining the mesh into the car shape using just few operations like extrude, remove, append, split and merge vertex.


I also cut off the faces where the windscreen and windows will be. The original faces were curved along both axes which is usually not the case for glass, especially not in the 50's. This is very important for realistic reflections and refractions, so I decided to model them later instead of using the faces already there.


Conversion of the model into SubD showed that the topology of the model needs to be changed in order to get a smooth surface fitting the car. All the faces with more than four vertices needed to be modified and while keeping as regular structure as possible. Triangles and vertices shared by more than 4 edges were not my friend as they can break the surface too.


Next I created the windows from the refined mesh.


Early in the making of the model I decided to use bump map for some of the small details in the body instead of the modeling them. Having the low polygon mesh, I thought it would be the best time to create the UV coordinates. I used manual selection of faces and planar projection on them the get the basic layout and then manually stitch them in the UV editor.


Conversion to SubD proved to be quite destructive for the UVs as lines are mapped onto curved lattices and the tessellation is adaptive.


I used a Subdiv proxy instead, which was easier to control because of the regular tessellation. Next few screen shots show creasing on some of the edges and vertices.


With the final structure of the fully defined I moved to creating the frames for the windscreens using extrusion and later the windscreens themselves. We can also see some of the early renders.


Next I added some chrome details using lofted curves on the mesh and then extruding the polygons on them. I also added some interior, which simply serves to prevent the car from looking as an empty shell.


The geometry is finally finished, as we can see from the render below.


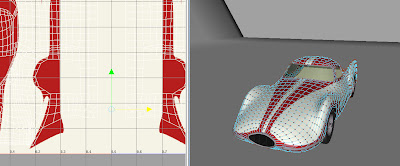
Next I added bump mapping and did refinements on the color texture mapping. To do this, I had to unwrap the UVs, as bump mapping in Maya uses world coordinates in combination with UVs and therefore did display properly on the mirrored side of the body. The screenshots shown the final UV setup for the bump map and color map


I will not go into more details about the texturing process, since is not part of the assignment. I'll just state that it took a surprisingly big amount of the time (more than 30% of the total.

With the model done it was time to render it. The materials in use are just basic blin for body, anisotropic for the chrome parts and transparent glass with index of refraction around 1.4. As all materials are highly reflective, I added some objects to the scene to be reflected into the car. First, a background was added, similar to a backdrop used in photo studios that doesn't have any visible sharp edges. In addition I added two stripes to further pronounce the shape of the body. For lighting, I used a simple three light setup with area lights and multisample shadows. All of this can be seen on the screenshot.


The final addition was a slight tint if green in the glass material, as this draft renders shows.


Done using an Intous 4 Wacom Tablet and Maya 2009.

Wednesday, March 10, 2010

Tracing Boxes

This is my last post on ray tracing, and it’s on tracing boxes. Spheres alone are not all that fun and the infinite planes have the drawback of being...well infinite. Therefore, I decided to put boxes to my ray tracer. It is of course possible to use 12 triangles. This is a general solution but it is not exactly cost effective and moreover, it does not scale well to collision detection, where boxes are often used (I am working on some physics code too). I started my journey by searching the web and of course, Real-Time Collision Detection by Christer Ericson, which is probably the best book in its field. What I got was plenty of fast algorithms that only tell if the there is an intersection or not, some of which give the intersection position too. Also few algorithms that give the normal vector as well, but most of them did checking against all 6 planes and went through lots of boundary conditions. As a normal vector is needed in ray tracing for light calculation, I decided to make the best of the both worlds.
The idea is very simple. Use the fast algorithm to get the intersection position and then use that information to get the normal. Say we have an axis aligned unit cube centered at the origin, a point on it and a vector to that point. The surface normal at that point is in the direction in which the vector extends the most. In case it’s not immediately obvious, let’s take one side of the cube, say the one laying on the x=1 plane. The side can be defined as an intersection of the x=1 plane and the cone made of half-spaces defined by x>|y| and x>|z|, which is exactly the same as the original statement. So now we have three steps of the algorithm.
  • First, calculate the position of the center of the box and calculate the vector from it to the point on the surface.
  • Next, scale the vector into a unit cube, to cancel the scaling of the box along the axes.
  • Finally, zero out the coordinates with smaller absolute value, and then normalize the resulting vector.
The first part of the algorithm, used to calculate the position of intersection, is taken straight from a text book on graphics. The relevant code from the Box class is below.

public class Box extends Traceable {

protected Vec3;
protected Vec3 max;

// Component-wise min
public static Vec3 min(Vec3 a, Vec3 b) {
return new Vec3( min(a.x, b.x),
min(a.y, b.y),
min(a.z, b.z));
}

// Component-wise max
public static Vec3 max(Vec3 a, Vec3 b) {
return new Vec3( max(a.x, b.x),
max(a.y, b.y),
max(a.z, b.z));
}

@Override
public IntersectionInfo intersect(Ray r) {
// Interval based test
Vec3 direction = new Vec3(r.direction);
direction.normalize();
//
Vec3 oneoverdir = new Vec3(1.0f / direction.x, 1.0f / direction.y, 1.0f / direction.z);
Vec3 tmin = min.minus(r.origin).times(oneoverdir);
Vec3 tmax = max.minus(r.origin).times(oneoverdir);
//
Vec3 realmin = min(tmax, tmin);
Vec3 realmax = max(tmax, tmin);
//
float minmax = min(min( realmax.x, realmax.y), realmax.z);
float maxmin = max(max( realmin.x, realmin.y), realmin.z);

if(minmax >= maxmin && maxmin > 0.0f) { // Have intersection
// Get position
float t = maxmin;
Vec3 position = r.origin.add(direction.times(t));

// Get normal
// 1. Get vector to relative position
Vec3 center = max.add( min ).times(0.5f);
Vec3 normal = position.minus(center);

// 2. Scale to matching unit box
normal.x /= max.x - min.x;
normal.y /= max.y - min.y;
normal.z /= max.z - min.z;

// 3. Keep the largest axis
if(Math.abs(normal.x) > Math.abs(normal.y)) {
normal.y = 0.0f;
if(Math.abs(normal.x) > Math.abs(normal.z))
normal.z = 0;
else
normal.x = 0;
} else {
normal.x = 0;
if(Math.abs(normal.y) > Math.abs(normal.z))
normal.z = 0;
else
normal.y = 0;
}
// 4. Normalize to unit
normal.normalize();
return new IntersectionInfo(position, normal, t, this);
}
//
return new IntersectionInfo(false);
}
} // end class
This might not be the fastest algorithm, but it beats most that I have come across on the internet. Here is one very ugly image showing ray tracing of a box in room and some normal mapping. Also the scene from the post on ambient occlusion was modeled with some boxes and a sphere.

The algorithm assumes that the box is axis aligned. This is not really an issue, as you can always do the intersection in the local space of the box. Transform the ray to the local space of the box with the inverse of rotation matrix of the box, find the intersection and normal and transform them back to world space with the rotation matrix of the box. Just have in mind that if you have scaling and translation applied to the box, the direction of the ray and the normal of the surface need special care.

Monday, January 4, 2010

Ambient Occlusion

Ambient Occlusion is a cheap and simple way to add global illumination effect to an rendered image, especially for a ray tracer. This adds depth and realism to the image. The sample below shows the difference.
An image rendered with ambient occlusion.

An image rendered without ambient occlusion.

The technique is as fake as it is straight forward, but if it's good enough for Pixar should be good enough for most purposes. Ambient occlusion for certain surface point is calculated by measuring how much light is blocked by it's surroundings. In a ray tracer this is done by casting rays from the surface point in all directions and counting how many hit the scene. In the following implementation we can also limit the radius if needed and the amount of shadowing due to occlusion.
int smp = Tracer.ambientOcclusionSamples;
int c = smp;
for(int i = 0; i < smp; i++) {    
   Vec3 dir = Vec3.randomOnHemisphere(nearestHit.normal);
   dir = dir.times(Tracer.occlusionRadius);
   Vec3 org = nearestHit.location;
   Ray feeler = new Ray(org, dir);
   if( feeler.hit( nearestHit.object ) )
      c--;
}
color = color.times(1.0f - Tracer.occlusionAmount) .add( color.times((c * Tracer.occlusionAmount) / (float)smp) );
Most of the code should be staright forward and easy to understand only the Vec3.randomOnHemisphere(nearestHit.normal); function requires some explanation. As the name states, this function returns a vector, uniformly distributed on the unit hemisphere above the given vector. This is achieved by trail and error; we create random vectors in a unit cube and discard the corers to get uniform distribution on a unit sphere and than discard all the vectors not facing the same way as the given vector using a dot product test.
public static Vec3 randomOnHemisphere(Vec3 direction) {
   // Cut off the corners of the cube
   Vec3 v;
   do {
   v = new Vec3(
      2 * (float)Math.random() - 1,
      2 * (float)Math.random() - 1,
      2 * (float)Math.random() - 1);
   } while(v.length() > 1.0f && v.dot(direction)
   v.normalize();
   return v;
}
On average, no more than two thirds of the vectors are discarded. This might not be the most efficient method, but it does not require any vector transformations and matrix multiplication. Another way to achieve the same effect is to use a precalculated set of vectors distributed on the vertices of a regular polyhedron and transform it to face in the given direction. In a addition a random rotation around the main axis will remove the artifacts of using the same set of vectors.
UPDATE: It seams that this article is getting a lot more attention during the semester, so what better date to make a small correction than beginning of September.
The above method treats all rays shoot from the a certain point equally, while actually they don't contribute to the illumination of that point equally. Instead their contribution needs to be weighted by the dot product of the ray direction with the normal at that point, according to the cosine law.
I have the original sources for the tracer, but have lost the scene files. If I find them and find some time I might post an updated version of the code and a better looking image.